Pages

Saturday, July 13, 2013

I am so excited to be a part of "Where Bloggers Create 2013"
My crafting/art/bedroom/sewing/you name it room is just what sounds like.
The room that fills many needs of a small family.

My daughter moved out about 4 years ago to attend college. Savannah College of Art and design (wonder where she got that from?) ha ha.
Anyways that left me a whole room to myself. Well sorta.

I had to keep the room functional for her visits so in went a murphy bed in the closet.  It fit perfectly! I could not believe it. But there went the closet!

So this is what I ended up doing with the little room.
This is from the door looking in. Yep it is small.
This is my work area for jewelry making, designing, anything that I need good lighting and the work is not messy like painting and glue. I have another space for that.
This is on the other wall and I can paint and glue to my hearts content. Won't hurt this little folding table!
My oil painting is next to that. I have to pull this out when I'm ready to paint and behind all that is the closet with the murphy bed.
Then next to that is my printing station.  I have 3 printers behind my rolling art case. Two are for photos and the top is for paper, shrinky dinks, etc., color of course!
Now for my wall of crafting supplies.  This took me awhile to decide what was going to make the most sense and would fit on the little wall. Ikea and Target.
Yeppers! I love the ikea storage bins! There are different size drawers, strong and very clean looking. for the little spaces left over I created a tower of plastic totes. I can easily remove the drawers while crafting and put them back.  Then again to Ikea for the black and white HUGE covered collapsible totes!


These drawers hold so much stuff!  I just got around to putting everything where it goes but still have to organize the drawers themselves!

 See how nice it looks!  The TV and the computer as well as my weighing station sits on top of all these. Must have for any crafters!  Love that my computer hooks  up to the TV and I can see everything in BIG screen!
I've been so inspired by the blogs that show all their material so nicely "filed". I had recently purchased this glass cabinet and didn't know what I was going to use it for so now I know!  I've started at the bottom. Now to get out my tote full of fabric. Oh did you notice the green boxes? Yep another use for my little room.
Yoga!  I recently had surgery for a torn rotator cuff (which has taken me away from crafting boo hoo) so I am determined to get that arm working again and get on with it. At least I have space in the middle of the floor to exercise!

 Now don't for one minute think I've got this whole room so organized and have no "junk".  I have to store the stuff like wrapping paper and boxes so they don't get ruined. They were just removed for the photos!


AND, yep, look at my garage full of stuff that can't quite possibly fit and, of course, could never be gotten rid of. ha ha


Well that's about it!  I have fun in my little space. I also take a break now and then in my old rocker... LOVE


OMG I just noticed this in one of my pictures....

OH NO - EMPTY DRAWERS - CAN'T HAVE THAT!


Guess where I'm headed.....Thrift Shopping. My favorite thing to do!
I just love excuses like this to get me motivated.

Thanks for stopping by!  Leave a comment. I would love to hear from you!

Sunday, April 21, 2013

Felicity the Cat

This is Felicity the Cat.
And because Felicity is going to my granddaughter's home to be loved by Gracie, Felicity will be the happiest cat ever!


Felicity was born (felted) April 20th, 2013.
She has pretty blue eyes, is grey with white tipped paws and tail.
Felicity also has black stripes and a cute pink nose.

She even has the cutest pink collar with a pretty pink bow!
She is about 2 inches tall and just a fuzzy little cat to love!

Altered Bottles

I love little bottles.
I love their shapes and their prettiness.
I've been wanting to do something with my collection but What?
Then I saw some altered bottles. Oooooh I must do that!

What I love most about doing things like this is giving each item a personality.
Once you start dressing them up they pretty much tell you what they need and when they are done!

Here are two of my nest creations.
It's a start!


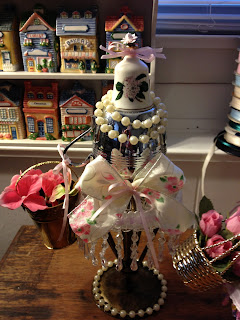
This little bottle is so pretty with its little design at the bottom in the glass. I added some old lace an lace applique and some pearls. 
Need to find a stopper, wax it on and fill it up with some glitter.

Next - shhh it's a surprise for my sister. She just loves fairy tales and stars. 
When you wish upon a star....

I found the star and the stopper at a Goodwill shop! Great find!
I added some beading around the top rim then added pearls on top of the ribbon.
I glued long crystals to the bottom of the stopper so they dangle in the jar.  I filled the bottom of the star with none other than magical pixie dust (glitter)!
I need to find a Tinkerbell or Pinochio to put on top of the stopper and it will be done! I think she will love it!

Now on to the rest of my collection!

The Garden Girls

I fell in love with a similar version of these at a show and have been dying to make them myself.  It has taken me quite some time and few bucks to find all the pieces that would work together and I finally had enough to bring these girls to life!  I call them My Garden Girls!  I think they had a fantastic day out watering and gathering flowers!

Completely made with vintage flea market finds, ribbons and bows and flowers!
Meet the group....


Now let me introduce you to each girl.

First we have Sally.

Sally loves birds and flowers. 
She has them on her dress and in her basket.
The neat thing about Sally is her lid opens up for you to store your secret treasures!

Next is Miss Potter.
She is my favorite.

She has a pretty wavey little skirt, adorns pearls and carries a watering can.
She is a simple joy!

Then we have Trixie.
She is stout but no doubt just adorable.

Trixie also carries a watering can and she loves flowers and pearls also.

Meet Sylvia.

Sylvia is a little undressed without her hat.
But that can easily be fixed.  Fill her little teapot with fresh cut flowers and she will surely smile!

Last but not least is Julia.

Julia just loves dress up! She has her pearls, her crystals and her pretty floral bow. She caries her cute little bucket filled with pretty pink flowers to match her bow!

I just loved making the girls. I think I will have to make some more!

Tell me what you think of the girls!

Tuesday, April 16, 2013

Oil Painting with a Vintage Flare

I love the look of those old black and white or sepia colored photos from the early 1900's. Recreating photos in photoshop can be a challenge to capture the right aged look. 

In learning how to oil paint with the tonal method, I fell in love with the process of starting a painting.  
To me it was exactly the vintage look I tried to recreate in Photoshop.  

What I love about this is these oil paintings are one of a kind and created by hand, with love and tenderness.
Let me know what you think.

This painting started out as a rub out. 
By turning the photo upside down and rubbing out the highlights
begins the process of capturing the innocence of this little tyke.
Once the rub out is dry it is easy to then fill in the tones with a big brush.
I just love this process!

This reminds me of some gentlemen possibly getting his photo taken just before boarding his yacht for a night of dancing and dining with his elite friends.
This too started upside down!  


New Found Hobby - Needle Felting

I have found a new passion!
This craft is called needle felting. Using 100% wool and very, very sharp needles I can create little tiny miniature creatures!

I made this little guy for LeeAnn, my granddaughter.
She named him Alfred.

This little pony was a special request from my granddaughter, Madison.
She wanted a pink horse!

My daughter, Brittany loves ducks 
so she was very excited to see this little guy coming her way.


My daughter, Cristina, loves dogs.
This was my very first attempt at the craft.
No doubt, I'm hooked!
One piece at a time, this little guy was created
with tender loving care!

Thanks to LivingFelt.com for sharing their works on Pinterest and Facebook which inspired me to try this wonderful craft.